Configuration
This section covers the initial configuration steps for setting up your EPMware application, including adding target application servers and creating your first application.
Add Target Application Server
The first step in configuring EPMware is to add your target application server. This establishes the connection between EPMware and your EPM systems.
Steps to Add Server
- Navigate to Configuration → Infrastructure → Servers
- Click the Add Server button
- Enter the server configuration details
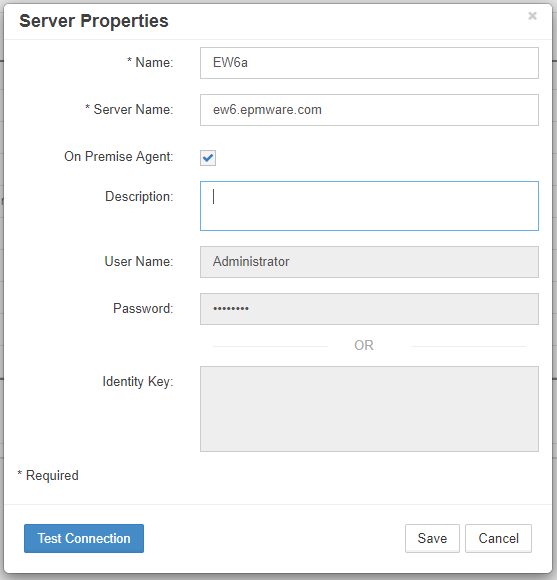
Server configuration dialog
Server Configuration Fields
| Field | Description | Required |
|---|---|---|
| Name | Name of the server | Yes |
| Server Name | Unique identifier for the server | Yes |
| On Premise Agent | Enabled , when On Premise agent | No |
| Enable Agent Polling | Enables alerts when the agent is down or unresponsive. Available only if ‘On Premise Agent’ is enabled | No |
| Agent Polling Interval | Specify Interval (in minutes) to check agent status. | No |
| Agent No Response Email Template | Specify Email template to be sent when agent is not responding | No |
| Description | Description | No |
| Username | Administrative user for the target system | Yes (if not on premise agent) |
| Password | Password for the administrative user | Yes |
| Identity Key | Indentity Key | No |
Username Case Sensitivity
The username field is case-sensitive. Ensure you enter it exactly as configured in your target system.
Test Connection
After entering the server details:
- Click Test Connection to verify connectivity
- Review any error messages
- Save the configuration once the test is successful
Create EPMware Application
After adding the target server, create your EPMware application.
Application Creation Steps
- Navigate to Configuration → Application → Configure
- Click the Add Application button

- Input the application properties
- Click Save
- Select the Properties Tab and select the new Application from the drop down
- Update the Properties as required
- Select the Configuration Tab and click Import
- Choose Manual Import or Auto Import
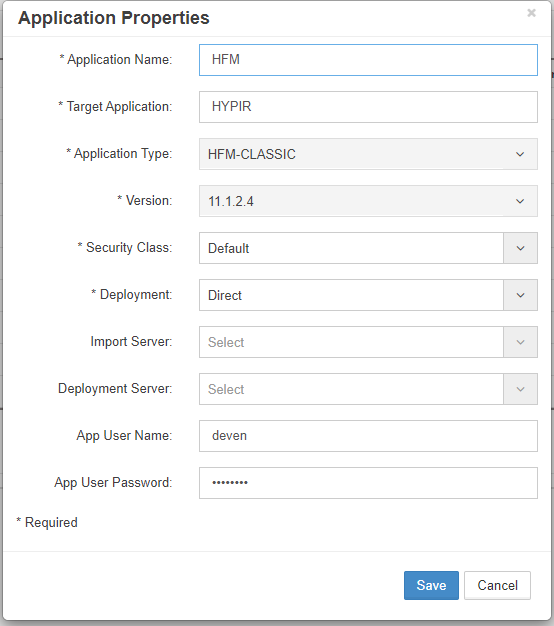
Application creation dialog
Import Progress
During import:
- Progress bar shows completion status
- Log displays current operations
- Errors are highlighted in red
- Warnings appear in yellow
Import Best Practices
- Review import logs for any warnings
- Verify imported data before proceeding
Troubleshooting
Common Configuration Issues
Server Connection Fails
- Verify network connectivity
- Check firewall rules
- Confirm server URL format
- Validate credentials
Application Creation Errors
- Ensure unique application name
- Check for special characters
- Verify server selection
- Review error logs
Import Failures
- Check source system availability
- Verify user permissions
Next Steps
After completing the configuration:
- Proceed to Security to update admin credentials
- Configure Global Settings
- Start required Services